K8S项目实践(05): 动手实现CSI驱动
简介
外部存储接入 Kubernetes 的方式主要有两种:In-Tree 和 Out-of-Tree。其中 In-Tree 是指存储驱动的源码都在 Kubernetes 代码库中,与 Kubernetes 一起发布、迭代、管理,这种方式灵活性较差,且门槛较高。Out-of-Tree 是指存储插件由第三方编写、发布、管理,作为一种扩展与 Kubernetes 配合使用。Out-of-Tree 主要有 FlexVolume 和 CSI 两种实现方式,其中,FlexVolume 因为其命令式的特点,不易维护和管理,从 Kubernetes v1.23 版本开始已被弃用。因此 CSI 已经成为 Kubernetes 存储扩展( Out-of-Tree )的唯一方式。
在介绍CSI之前,先梳理一下kubernetes中使用存储有哪些步骤:
1、创建pv对象
2、存储服务器上创建一个volume
3、把创建的volume挂载到宿主机上
4、格式化volume
5、把格式化的volume mount到pod的volume目录
6、创建pvc对象并和pv对象绑定
7、pod使用pvc
代码工程:https://github.com/mospany/nfscsi.git
术语
| 缩写 | 英文全称 | 中文全称 | 描述 |
|---|---|---|---|
| pvc | PersistentVolumeClaim | 持久卷声明 | 描述的是pod希望使用的持久化存储的属性 |
| pv | PersistentVolume | 持久卷 | 描述的是具体的持久化存储数据卷信息 |
| storageClass | storageClass | 存储类 | 创建pv的模板 |
CSI组成
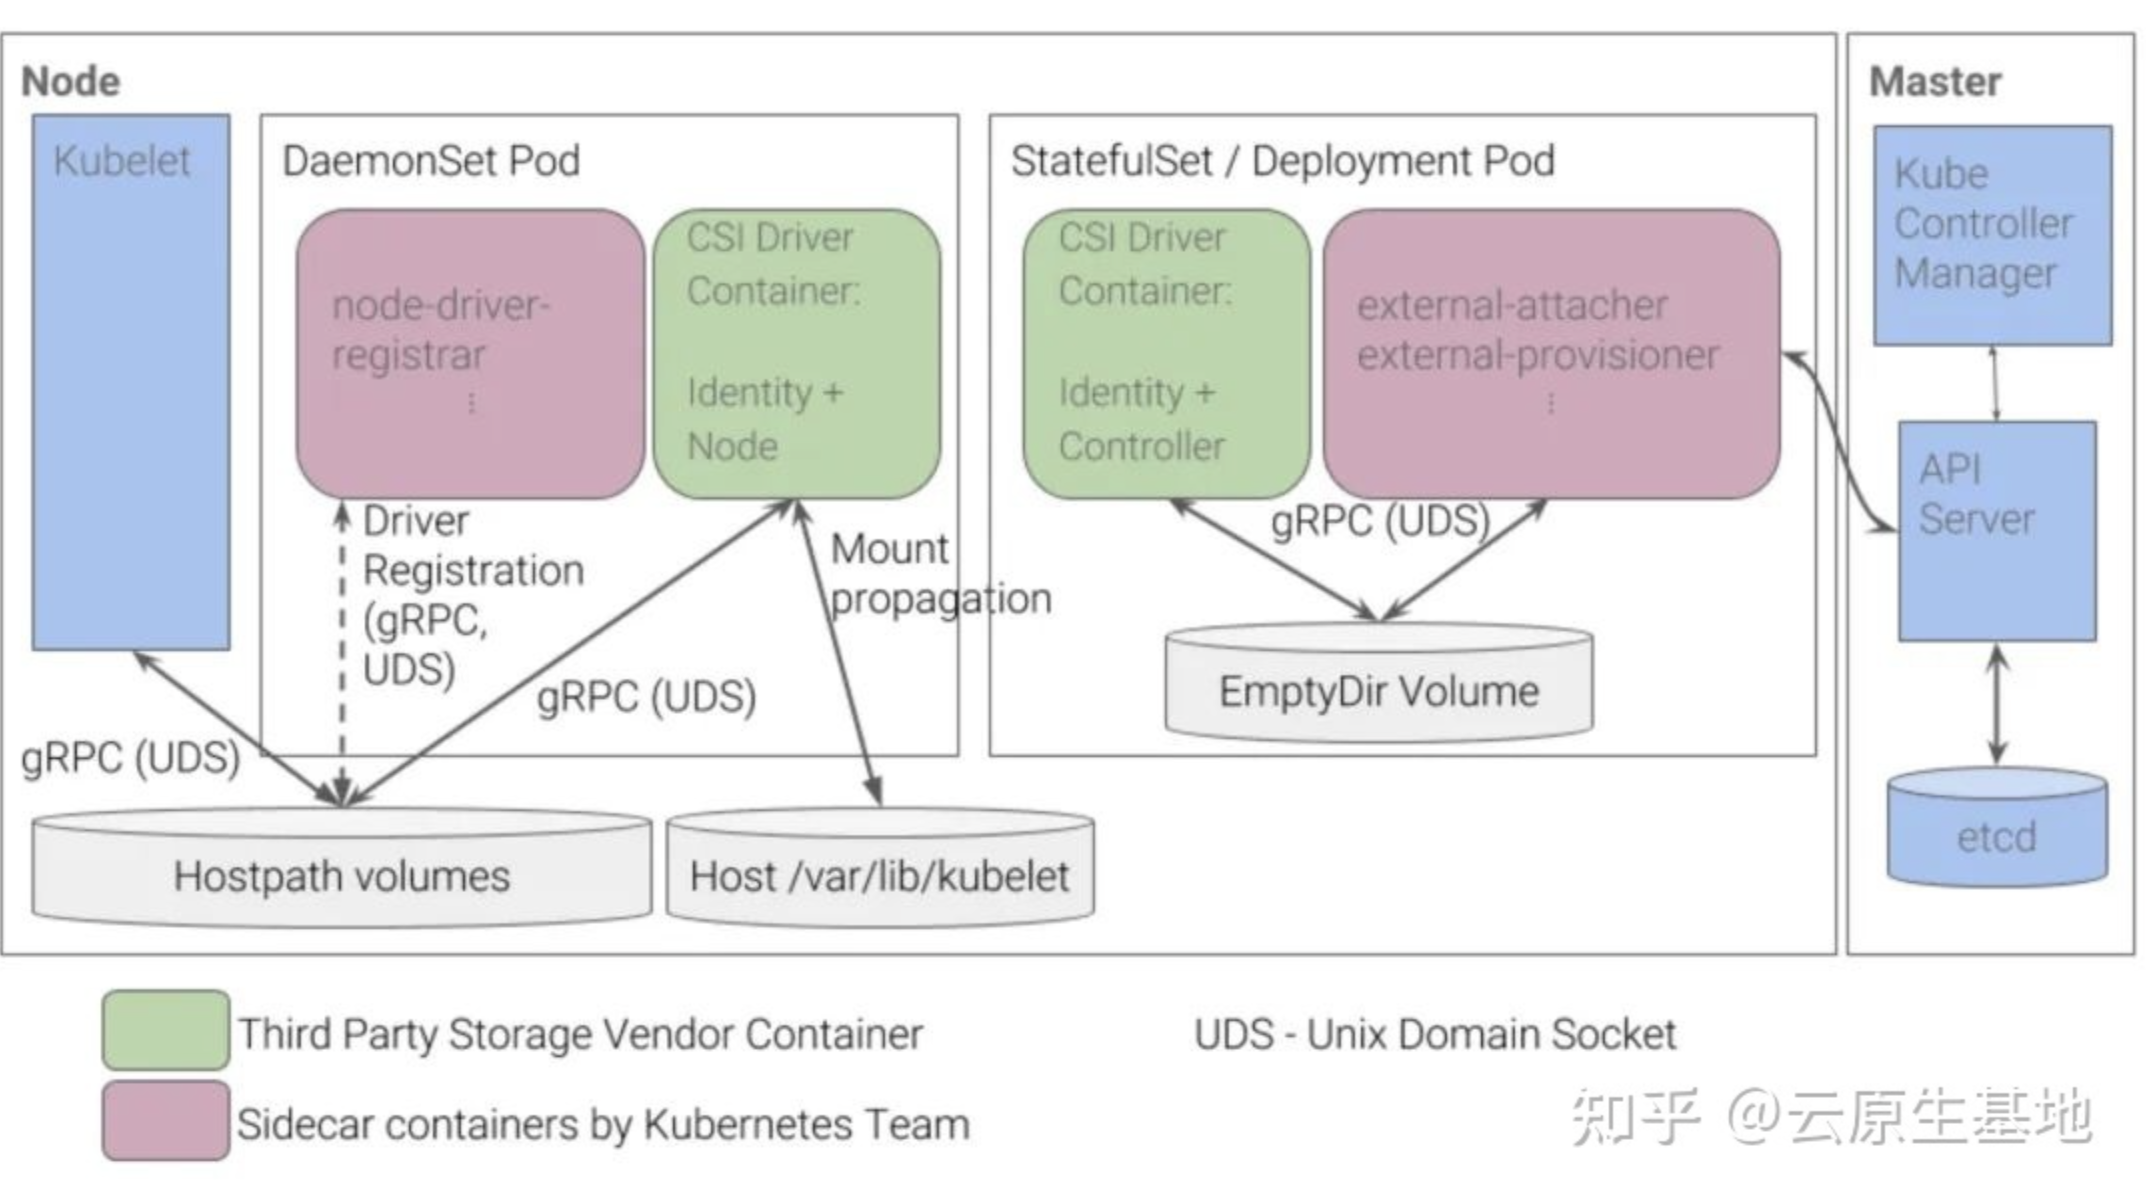
通常情况下:CSI Driver = DaemonSet + Deployment(StatefuleSet) 。
其中:
- 绿色部分:Identity、Node、Controller 是需要开发者自己实现的,被称为 Custom Components。
- 粉色部分:node-driver-registrar、external-attacher、external-provisioner 组件是 Kubernetes 团队开发和维护的,被称为 External Components,它们都是以 sidecar 的形式与 Custom Components 配合使用的。
Custom Components
Custom Components 本质是 3 个 gRPC Services:
Identity Service 顾名思义,主要用于对外暴露这个插件本身的信息,比如驱动的名称、驱动的能力等:
//github.com/container-storage-interface/spec/lib/go/csi/csi.pb.go
type IdentityServer interface {
    GetPluginInfo(context.Context, *GetPluginInfoRequest) (*GetPluginInfoResponse, error)
    GetPluginCapabilities(context.Context, *GetPluginCapabilitiesRequest) (*GetPluginCapabilitiesResponse, error)
    Probe(context.Context, *ProbeRequest) (*ProbeResponse, error)
}
Controller Service 主要定义一些 无需在宿主机上执行的操作,这也是与下文的 Node Service 最根本的区别。以 CreateVolume 为例,k8s 通过调用该方法创建底层存储。比如底层使用了某云供应商的云硬盘服务,开发者在 CreateVolume 方法实现中应该调用云硬盘服务的创建 / 订购云硬盘的 API,调用 API 这个操作是不需要在特定宿主机上执行的。
// github.com/container-storage-interface/spec/lib/go/csi/csi.pb.go
type ControllerServer interface {
    CreateVolume(context.Context, *CreateVolumeRequest) (*CreateVolumeResponse, error)
    DeleteVolume(context.Context, *DeleteVolumeRequest) (*DeleteVolumeResponse, error)
    ControllerPublishVolume(context.Context, *ControllerPublishVolumeRequest) (*ControllerPublishVolumeResponse, error)
    ControllerUnpublishVolume(context.Context, *ControllerUnpublishVolumeRequest) (*ControllerUnpublishVolumeResponse, error)
    ValidateVolumeCapabilities(context.Context, *ValidateVolumeCapabilitiesRequest) (*ValidateVolumeCapabilitiesResponse, error)
    ListVolumes(context.Context, *ListVolumesRequest) (*ListVolumesResponse, error)
    GetCapacity(context.Context, *GetCapacityRequest) (*GetCapacityResponse, error)
    ControllerGetCapabilities(context.Context, *ControllerGetCapabilitiesRequest) (*ControllerGetCapabilitiesResponse, error)
    CreateSnapshot(context.Context, *CreateSnapshotRequest) (*CreateSnapshotResponse, error)
    DeleteSnapshot(context.Context, *DeleteSnapshotRequest) (*DeleteSnapshotResponse, error)
    ListSnapshots(context.Context, *ListSnapshotsRequest) (*ListSnapshotsResponse, error)
    ControllerExpandVolume(context.Context, *ControllerExpandVolumeRequest) (*ControllerExpandVolumeResponse, error)
    ControllerGetVolume(context.Context, *ControllerGetVolumeRequest) (*ControllerGetVolumeResponse, error)
}
Node Service 定义了 需要在宿主机上执行的操作,比如:mount、unmount。在前面的部署架构图中,Node Service 使用 Daemonset 的方式部署,也是为了确保 Node Service 会被运行在每个节点,以便执行诸如 mount 之类的指令。
// github.com/container-storage-interface/spec/lib/go/csi/csi.pb.go
type NodeServer interface {
    NodeStageVolume(context.Context, *NodeStageVolumeRequest) (*NodeStageVolumeResponse, error)
    NodeUnstageVolume(context.Context, *NodeUnstageVolumeRequest) (*NodeUnstageVolumeResponse, error)
    NodePublishVolume(context.Context, *NodePublishVolumeRequest) (*NodePublishVolumeResponse, error)
    NodeUnpublishVolume(context.Context, *NodeUnpublishVolumeRequest) (*NodeUnpublishVolumeResponse, error)
    NodeGetVolumeStats(context.Context, *NodeGetVolumeStatsRequest) (*NodeGetVolumeStatsResponse, error)
    NodeExpandVolume(context.Context, *NodeExpandVolumeRequest) (*NodeExpandVolumeResponse, error)
    NodeGetCapabilities(context.Context, *NodeGetCapabilitiesRequest) (*NodeGetCapabilitiesResponse, error)
    NodeGetInfo(context.Context, *NodeGetInfoRequest) (*NodeGetInfoResponse, error)
}
原理
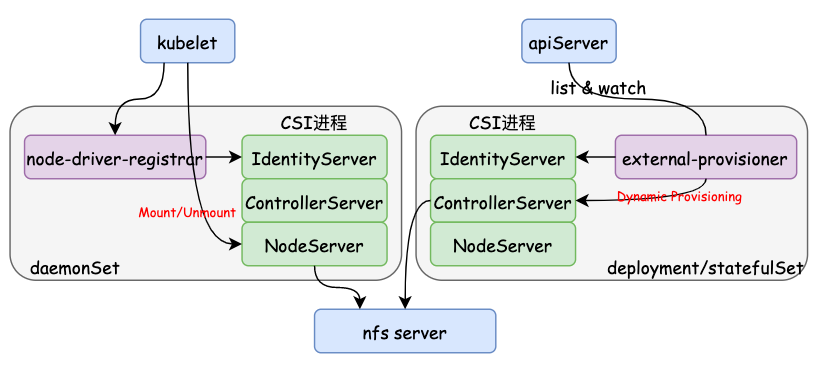
1、首先肯定是要在一个进程里编程实现前面提到的三个gRPC服务对应的方法,例如IdentityServer下的三个方法、ControllerServer下的CreateVolume/DeleteVolume方法以及NodeServer下的NodePublishVolume/NodeUnpublishVolume方法等,并以unix sock的方式提供gRPC服务(后文会用到),并打包成镜像;
2、把node-driver-registrar和CSI服务作为两个容器放到一个pod里,这样node-driver-registrar服务就可以用unix sock的方式访问CSI进程里的gRPC服务并且向kubelet注册;
3、node-driver-registrar完成注册后,后续的Mount/Unmount等操作kubelet会直接通过unix sock访问CSI。这里有两层含义:第一层含义是kubelet会直接通过unix sock访问CSI,因此CSI需要用hostPath的方式把自己unix sock文件暴露;第二层含义是kubelet直接调用CSI服务,这意味着node-driver-registrar和CSI的这个pod应该是daemonSet形式部署的;
4、把external-provisioner和CSI服务作为两个容器放到一个pod里,去实现Dynamic Provisioning功能。因为Dynamic Provisioning设计创建卷和删除卷,因此这个pod应该看做是有状态的,在部署上通常是带有选举的deployment部署或者副本数为1的statefulSet部署(如果需要Attach/Detach功能,也可以再加个容器把external-attacher放到这个pod中)。
CSI注册流程

相关的步骤释义如下:
1、kubelet启动后基于fsnotify监听/var/lib/kubelet/plugins_registry目录;
2、node-driver-registrar启动通过启动参数中配置的CSI进程的sock文件,调CSI进程的GetPluginInfo方法获取CSI插件名称;
3、node-driver-registrar启动后在/var/lib/kubelet/plugins_registry目录下创建自己的sock文件{csiName}-reg.sock;
4、kubelet的watcher监听到/var/lib/kubelet/plugins_registry目录下有sock文件创建,把该sock文件信息存入内存中的desiredStateOfWorld对象中;
5、kubelet中有个reconciler协程周期性的检查desiredStateOfWorld对象和actualStateOfWorld对象中的数据差异,发现有新的CSI插件需要执行注册过程;
6、reconciler通过/var/lib/kubelet/plugins_registry/{csiName}-reg.sock,调用node-driver-registrar下的GetInfo方法获取CSI插件的名称和CSI进程的sock文件路径等信息;
7、reconciler通过上一步拿到的CSI进程sock文件,调用CSI进程下NodeGetInfo方法获取一些数据用于后续的Node和CSINode对象;
8、组装数据调apiServer接口更新本节点对应的Node对象的annotation;
9、组装数据调apiServer接口创建/更新对应的CSINode对象;
10、reconciler通过/var/lib/kubelet/plugins_registry/{csiName}-reg.sock,调用node-driver-registrar的NotifyRegistrationStatus方法,告知其注册结果。
NFS搭建
由于实现CSI需要一个后端存储,Linux提供NFS功能可以免费搭建一个NSC存储功能用来验证。
搭建办法详见: CentOS7 下安装和配置 NFS
部署
部署node
进入代码工程中的deploy下运行命令`kubectl apply -f node.yaml`
[root@k8s-master nfscsi]# pwd
/root/nfscsi
[root@k8s-master nfscsi]# cd deploy/
[root@k8s-master deploy]# ls
node.yaml  provisioner.yaml
[root@k8s-master deploy]# ll
总用量 12
-rw-r--r-- 1 root root 3720 1月   8 22:18 node.yaml
-rw-r--r-- 1 root root 4413 1月   8 22:16 provisioner.yaml

[root@k8s-master deploy]# k apply -f node.yaml
serviceaccount/nfs-csi-node created
clusterrole.rbac.authorization.k8s.io/nfs-csi-node created
clusterrolebinding.rbac.authorization.k8s.io/nfs-csi-node created
daemonset.apps/nfs-csi-node created
[root@k8s-master deploy]#
查看POD的运行状态:
[root@k8s-master deploy]# k get pod -A -o wide | grep nfs
kube-system   nfs-csi-node-x28zj                         2/2     Running   0                10m   172.25.140.216   k8s-master   <none>           <none>
[root@k8s-master deploy]#
[root@k8s-master deploy]# k get ds -A
NAMESPACE     NAME           DESIRED   CURRENT   READY   UP-TO-DATE   AVAILABLE   NODE SELECTOR                                              AGE
kube-system   calico-node    3         3         3       3            3           kubernetes.io/os=linux                                     19d
kube-system   kube-proxy     3         3         3       3            3           kubernetes.io/os=linux                                     52d
kube-system   nfs-csi-node   1         1         1       1            1           kubernetes.io/hostname=k8s-master,kubernetes.io/os=linux   10m
[root@k8s-master deploy]#
pod正常启动后,先查看node-driver-registrar的日志,注册正常:
[root@k8s-master nfscsi]# kubectl logs -n kube-system nfs-csi-node-x28zj node-driver-registrar
I0115 07:45:31.451826       1 main.go:166] Version: v2.5.0
I0115 07:45:31.451864       1 main.go:167] Running node-driver-registrar in mode=registration
I0115 07:45:31.452324       1 main.go:191] Attempting to open a gRPC connection with: "/csi/csi.sock"
I0115 07:45:32.455714       1 main.go:198] Calling CSI driver to discover driver name
I0115 07:45:32.457464       1 main.go:208] CSI driver name: "nfscsi"
I0115 07:45:32.457493       1 node_register.go:53] Starting Registration Server at: /registration/nfscsi-reg.sock
I0115 07:45:32.457582       1 node_register.go:62] Registration Server started at: /registration/nfscsi-reg.sock
I0115 07:45:32.458992       1 node_register.go:92] Skipping HTTP server because endpoint is set to: ""
I0115 07:45:33.018081       1 main.go:102] Received GetInfo call: &InfoRequest{}
I0115 07:45:33.018292       1 main.go:109] "Kubelet registration probe created" path="/var/lib/kubelet/plugins/csi-nfsplugin/registration"
I0115 07:45:33.623838       1 main.go:120] Received NotifyRegistrationStatus call: &RegistrationStatus{PluginRegistered:true,Error:,}
[root@k8s-master nfscsi]# ll /var/lib/kubelet/plugins/csi-nfsplugin/csi.sock
srwxr-xr-x 1 root root 0 1月  15 15:45 /var/lib/kubelet/plugins/csi-nfsplugin/csi.sock
[root@k8s-master nfscsi]#
再看看自己编码nfs-csi容器日志,注册过程只调用了GetPluginInfo和NodeGetInfo
方法:
[root@k8s-master nfscsi]# kubectl logs -n kube-system nfs-csi-node-x28zj nfs-csi
2023/01/15 07:45:31 driverName: nfscsi, version: N/A, nodeID: k8s-master
2023/01/15 07:45:31 grpc server start
2023/01/15 07:45:32 GetPluginInfo request
2023/01/15 07:45:33 NodeGetInfo request
[root@k8s-master nfscsi]#
node-driver-registrar和CSI进程的sock文件:
[root@k8s-master nfscsi]# ll /var/lib/kubelet/plugins_registry/
总用量 0
srwx------ 1 root root 0 1月  15 15:45 nfscsi-reg.sock
[root@k8s-master nfscsi]#
node对象的annotation:
[root@k8s-master nfscsi]# kubectl get node k8s-master  -oyaml| grep annotations -A 9
annotations:
  csi.volume.kubernetes.io/nodeid: '{"nfscsi":"k8s-master"}'
  kubeadm.alpha.kubernetes.io/cri-socket: /var/run/dockershim.sock
  node.alpha.kubernetes.io/ttl: "0"
  projectcalico.org/IPv4Address: 172.25.140.216/20
  projectcalico.org/IPv4IPIPTunnelAddr: 10.244.235.192
  volumes.kubernetes.io/controller-managed-attach-detach: "true"
creationTimestamp: "2022-11-23T15:34:38Z"
labels:
  app: hdls-csi-controller
[root@k8s-master nfscsi]#
最后验证CSINode对象:
[root@k8s-master nfscsi]# k get csinode -o wide
NAME         DRIVERS   AGE
k8s-master   1         52d
k8s-work1    0         52d
k8s-work2    0         52d
[root@k8s-master nfscsi]# kubectl get csinode k8s-master -o yaml
apiVersion: storage.k8s.io/v1
kind: CSINode
metadata:
  annotations:
    storage.alpha.kubernetes.io/migrated-plugins: kubernetes.io/aws-ebs,kubernetes.io/azure-disk,kubernetes.io/cinder,kubernetes.io/gce-pd
  creationTimestamp: "2022-11-23T15:34:38Z"
  name: k8s-master
  ownerReferences:
  - apiVersion: v1
    kind: Node
    name: k8s-master
    uid: cb4c3e59-66e5-40a0-a385-aa2072719381
  resourceVersion: "278990"
  uid: cf0f93f0-495e-49f2-88b4-6f7126ca6176
spec:
  drivers:
  - name: nfscsi
    nodeID: k8s-master
    topologyKeys: null
[root@k8s-master nfscsi]#
到这里我们成功完成并验证了CSI的注册。
[root@k8s-master deploy]# k logs -n kube-system nfs-csi-node-vxkc8  nfs-csi
2023/01/15 08:33:22 driverName: nfscsi, version: N/A, nodeID: k8s-master
2023/01/15 08:33:22 grpc server start
2023/01/15 08:33:23 GetPluginInfo request
2023/01/15 08:33:23 NodeGetInfo request
2023/01/15 09:42:25 NodeGetCapabilities request
2023/01/15 09:42:25 NodeGetCapabilities request
2023/01/15 09:42:25 NodeGetCapabilities request
2023/01/15 09:42:25 NodeGetCapabilities request
2023/01/15 09:42:25 NodePublishVolume request
2023/01/15 09:42:25 source: 127.0.0.1:/data/pvc-910384b5-b5eb-4196-b6d3-876f9679ed05, targetPath: /var/lib/kubelet/pods/e86fa053-7d1b-4330-a6f2-555d350b45e9/volumes/kubernetes.io~csi/pvc-910384b5-b5eb-4196-b6d3-876f9679ed05/mount, options: []
2023/01/15 09:43:20 NodeGetCapabilities request
当POD执行CreateVolume是将调用nodeService里的NodePublishVolume方法进行mount操作,即把nfs里的pvc-子目录mount到宿主机pod目录卷下。
部署provisioner
Dynamic Provisioning原理:所谓的Dynamic Provisioning,其实就是创建pvc后会自动创建卷和pv,并把pv和pvc绑定
部署运行:
[root@k8s-master deploy]# kubectl apply -f provisioner.yaml
storageclass.storage.k8s.io/nfscsi created
csidriver.storage.k8s.io/nfscsi created
serviceaccount/nfs-csi-provisioner created
clusterrole.rbac.authorization.k8s.io/nfs-csi-provisioner created
clusterrolebinding.rbac.authorization.k8s.io/nfs-csi-provisioner created
deployment.apps/nfs-csi-provisioner created
[root@k8s-master deploy]#
观察对应的provisioner是否起来:
[root@k8s-master deploy]# k get pod -A -o wide | grep nfs
kube-system   nfs-csi-node-vxkc8                         2/2     Running   0               10m     172.25.140.216   k8s-master   <none>           <none>
kube-system   nfs-csi-provisioner-6f7db46646-77lqv       2/2     Running   0               2m20s   172.25.140.216   k8s-master   <none>           <none>
[root@k8s-master deploy]#
创建PVC
准备一个如下的pvc yaml,apply该yaml:
[root@k8s-master test]# pwd
/root/nfscsi/test
[root@k8s-master test]# cat pvc.yaml
apiVersion: v1
kind: PersistentVolumeClaim
metadata:
  name: test-pvc
spec:
  accessModes:
    - ReadWriteOnce
  storageClassName: nfscsi
  resources:
    requests:
      storage: 1Gi
查看是否会自动创建卷、pv,并和pvc绑定:
[root@k8s-master test]# kubectl apply -f pvc.yaml
persistentvolumeclaim/test-pvc created
[root@k8s-master test]# k get pvc
NAME       STATUS   VOLUME                                     CAPACITY   ACCESS MODES   STORAGECLASS   AGE
test-pvc   Bound    pvc-910384b5-b5eb-4196-b6d3-876f9679ed05   1Gi        RWO            nfscsi         20s
[root@k8s-master test]# k get pv
NAME                                       CAPACITY   ACCESS MODES   RECLAIM POLICY   STATUS     CLAIM              STORAGECLASS   REASON   AGE
pvc-910384b5-b5eb-4196-b6d3-876f9679ed05   1Gi        RWO            Delete           Bound      default/test-pvc   nfscsi                  35s
[root@k8s-master test]# ll /mnt/nfs-data/
总用量 16
drwxr-xr-x 2 root root 4096 1月  15 17:06 pvc-910384b5-b5eb-4196-b6d3-876f9679ed05
[root@k8s-master test]# ll /data/
总用量 16
drwxr-xr-x 2 root root 4096 1月   8 22:22 pvc-7115a52d-ba4f-4571-adbc-25e71941ca55
[root@k8s-master test]#
查看provisioner pod日志:
[root@k8s-master test]# k logs -n kube-system  nfs-csi-provisioner-6f7db46646-77lqv nfs-csi
2023/01/15 08:41:03 driverName: nfscsi, version: N/A, nodeID: k8s-master
2023/01/15 08:41:03 grpc server start
2023/01/15 08:41:04 Probe request
2023/01/15 08:41:04 GetPluginInfo request
2023/01/15 08:41:04 GetPluginCapabilities request
2023/01/15 08:41:04 ControllerGetCapabilities request
...
2023/01/15 09:06:26 CreateVolume request
2023/01/15 09:06:26 req name:  pvc-910384b5-b5eb-4196-b6d3-876f9679ed05
可以看出创建pvc时自动绑定pv成功。
删除PVC
同理。
测试
验证POD使用CSI
先准备POD的yaml
[root@k8s-master test]# cat pod.yaml
apiVersion: v1
kind: Pod
metadata:
  name: test-nginx-sci-pod
spec:
  nodeName: k8s-master  # 运行在安装了csi插件的node上
  containers:
  - name: nginx
    image: nginx:latest
    imagePullPolicy: IfNotPresent
    volumeMounts:
    - name: nfs-pvc
      mountPath: /var/log/nginx
  volumes:
  - name: nfs-pvc
    persistentVolumeClaim:
      claimName: test-pvc
   [root@k8s-master test]#
运行
[root@k8s-master test]# kubectl apply -f pod.yaml
pod/test-nginx-sci-pod created
[root@k8s-master test]# kubectl get pod -A | grep test-nginx
default       test-nginx-sci-pod                         1/1     Running   0                18s
[root@k8s-master test]#
查看nginx日志
[root@k8s-master test]# ll /mnt/nfs-data/pvc-910384b5-b5eb-4196-b6d3-876f9679ed05/
总用量 4
-rw-r--r-- 1 root root    0 1月  15 17:48 access.log
-rw-r--r-- 1 root root 1641 1月  15 17:52 error.log
[root@k8s-master test]#
[root@k8s-master test]# tail /mnt/nfs-data/pvc-910384b5-b5eb-4196-b6d3-876f9679ed05/access.log
[root@k8s-master test]# tail /mnt/nfs-data/pvc-910384b5-b5eb-4196-b6d3-876f9679ed05/error.log
2023/01/15 09:49:20 [notice] 1#1: worker process 33 exited with code 0
2023/01/15 09:49:20 [notice] 1#1: exit
2023/01/15 09:51:39 [notice] 1#1: using the "epoll" event method
2023/01/15 09:51:39 [notice] 1#1: nginx/1.21.5
2023/01/15 09:51:39 [notice] 1#1: built by gcc 10.2.1 20210110 (Debian 10.2.1-6)
2023/01/15 09:51:39 [notice] 1#1: OS: Linux 3.10.0-957.21.3.el7.x86_64
2023/01/15 09:51:39 [notice] 1#1: getrlimit(RLIMIT_NOFILE): 65536:65536
2023/01/15 09:51:39 [notice] 1#1: start worker processes
2023/01/15 09:51:39 [notice] 1#1: start worker process 32
2023/01/15 09:51:39 [notice] 1#1: start worker process 33
[root@k8s-master test]#
[root@k8s-master test]# ll /data/pvc-910384b5-b5eb-4196-b6d3-876f9679ed05/
总用量 4
-rw-r--r-- 1 root root    0 1月  15 17:48 access.log
-rw-r--r-- 1 root root 1641 1月  15 17:52 error.log
[root@k8s-master test]#
可以看出宿主机和nfs服务器上该pvc下已经有nginx日志生成达到了目的。
csc功能测试命令
安装
go install -v github.com/rexray/gocsi/csc@latest使用go env查看GOPATH, go install 的程序一般就放在第一个路径下的bin
把它拷贝到目标机上并加可执行权限。
命令
[root@k8s-master csi-hdls]# ./csc
NAME
    csc -- a command line container storage interface (CSI) client

SYNOPSIS
    csc [flags] CMD

AVAILABLE COMMANDS
    controller
    identity
    node

Use "csc -h,--help" for more information
[root@k8s-master csi-hdls]# ./csc controller help
NAME
    controller -- the csi controller service rpcs

SYNOPSIS
    csc controller [flags] CMD

AVAILABLE COMMANDS
    create-snapshot
    create-volume
    delete-snapshot
    delete-volume
    expand-volume
    get-capabilities
    get-capacity
    list-snapshots
    list-volumes
    publish
    unpublish
    validate-volume-capabilities

Use "csc controller -h,--help" for more information
[root@k8s-master csi-hdls]#
emptyDir的位置应该位于运行pod的给定节点上的/var/lib/kubelet/pods/{podid}/volumes/kubernetes.io~empty-dir/中
参考
【01】如何实现一个 Kubernetes CSI Driver
【02】Kubernetes CSI 驱动开发指南
【03】gRPC详细入门介绍
【04】如何编写一个 CSI 插件
【05】Kubernetes K8S之固定节点nodeName和nodeSelector调度详解
【06】kubernetes CSI(下)
【07】阿里云服务器 CentOS7 下安装和配置 NFS


作者:mospan
微信关注:墨斯潘園
本文出处:http://mospany.github.io/2022/12/22/k8s-sci-driver/
文章版权归本人所有,欢迎转载,但未经作者同意必须保留此段声明,且在文章页面明显位置给出原文连接,否则保留追究法律责任的权利。